In partnership with

Take the bite out of rising vet costs with pet insurance

Veterinarians across the country have reported pressure from corporate managers to prioritize profit. This incentivized higher patient turnover, increased testing, and upselling services. Pet insurance could help you offset some of these rising costs, with some providing up to 90% reimbursement.
🚀 Your Investing Journey Just Got Better: Premium Subscriptions Are Here! 🚀
It’s been 4 months since we launched our premium subscription plans at GuruFinance Insights, and the results have been phenomenal! Now, we’re making it even better for you to take your investing game to the next level. Whether you’re just starting out or you’re a seasoned trader, our updated plans are designed to give you the tools, insights, and support you need to succeed.
Here’s what you’ll get as a premium member:
Exclusive Trading Strategies: Unlock proven methods to maximize your returns.
In-Depth Research Analysis: Stay ahead with insights from the latest market trends.
Ad-Free Experience: Focus on what matters most—your investments.
Monthly AMA Sessions: Get your questions answered by top industry experts.
Coding Tutorials: Learn how to automate your trading strategies like a pro.
Masterclasses & One-on-One Consultations: Elevate your skills with personalized guidance.
Our three tailored plans—Starter Investor, Pro Trader, and Elite Investor—are designed to fit your unique needs and goals. Whether you’re looking for foundational tools or advanced strategies, we’ve got you covered.
Don’t wait any longer to transform your investment strategy. The last 4 months have shown just how powerful these tools can be—now it’s your turn to experience the difference.

Managing your portfolio and staying on top of your investments is incredibly important! However, keeping your portfolio updated with the latest pricing and information about your stocks can be challenging. While Excel is a fantastic tool that allows daily updates, it can be highly time-consuming. Your broker, Yahoo Finance, and other platforms provide decent options for tracking your portfolio, but I’ve often found that something I truly need is missing.
How about you have your portfolio updated automatically with the information you want using Notion and EODHD data?
What Top Execs Read Before the Market Opens
The Daily Upside was built by investment pros to give execs the intel they need—no fluff, just sharp insights on trends, deals, and strategy. Join 1M+ professionals and subscribe for free.
What is Notion
While Notion is an online productivity and collaboration platform that combines note-taking, Kanban boards, wikis, real-time editing, and task management into one place, it has something that is really amazing and complements what it offers.
Databases! Well, it is not an SQL-driven engine, but practically, you can think of it as an Excel spreadsheet you keep online. You can create fields based on formulas and also connect to other databases and extract data from them.
Notion Custom Integration
Notion, among others, has various integrations with other systems; however, the most important aspect we will focus on in this article is its support for custom API integration. So, let’s explore how we can achieve that.
First, go to https://developers.notion.com/ and select “View My Integrations”. It will take you to the home page of integrations as shown below:
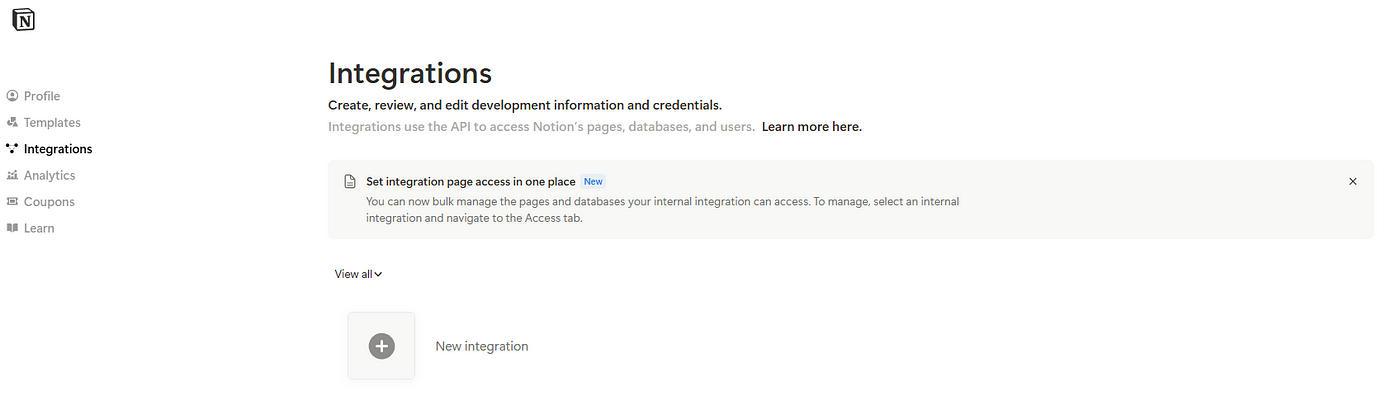
There, you should choose to add a new integration
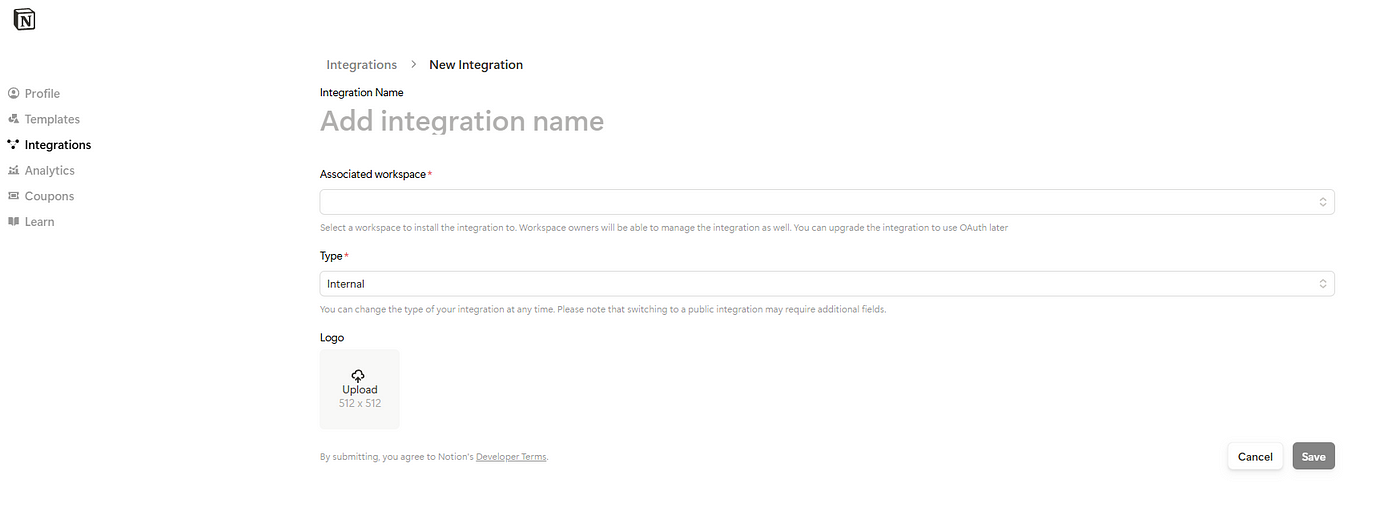
You should add an integration name, select your workspace (which is usually just our personal one) and also select 'Internal'.
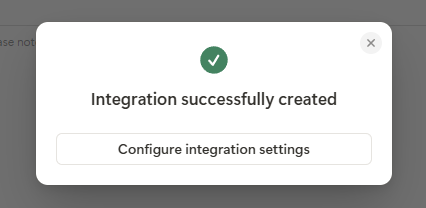
You will get the following confirmation:
Then, you should configure the integration settings:
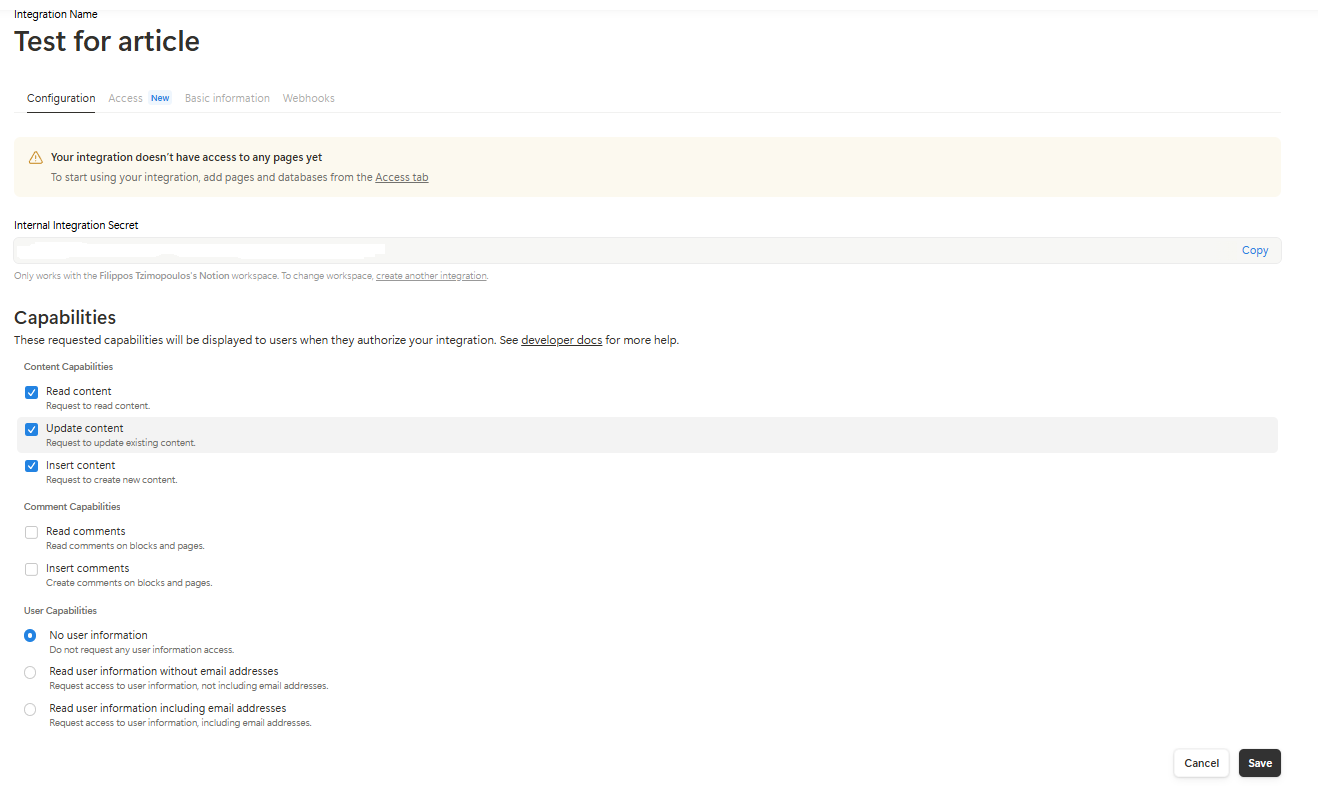
On this screen, you can copy your secret key. You should retain the capabilities to read, update, and insert content only—nothing more.
Create the database
Having configured our connection, we should now create our database.
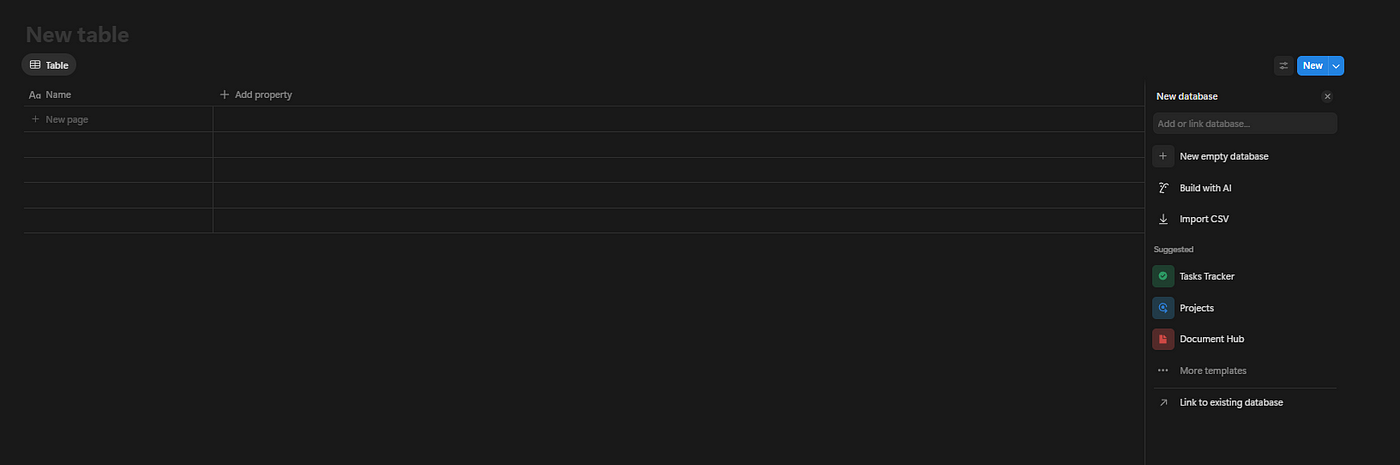
At any page, typing a backslash brings up a menu of actions you can take. Simply select “Database — Full Page” and you'll be taken to a new page, as shown below.
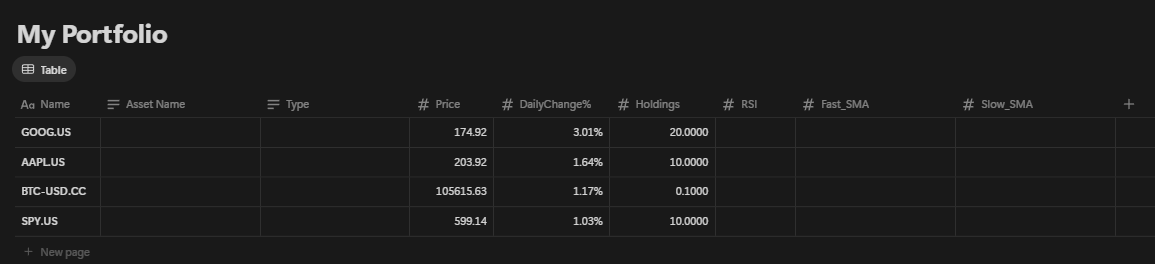
Add a table name (e.g. My Portfolio) and begin adding properties. In our example we are going to add the following:
Asset Name: type text — the name of the asset we will monitor
Type: type text- the type of the assets (Stock, ETF, etc.)
Price: type numeric- the current price of the asset
DailyChange%- type numeric- the daily percentage change of assets
Holdings- type numeric — our holdings on the asset
RSI-type numeric- current value of RSI indicator
Fast_SMA- type numeric- current Simple Moving Average of 20
Slow_SMA- type numeric- current Simple Moving Average of 200
Now, all you need to do is add the tickers of your portfolio to the first column (Name), which is the default column in the database, and the quantities you own to the Holdings column. To update the datapoints later, use the asset’s ticker, as the EODHD API requires this - for example, Apple is AAPL.US.
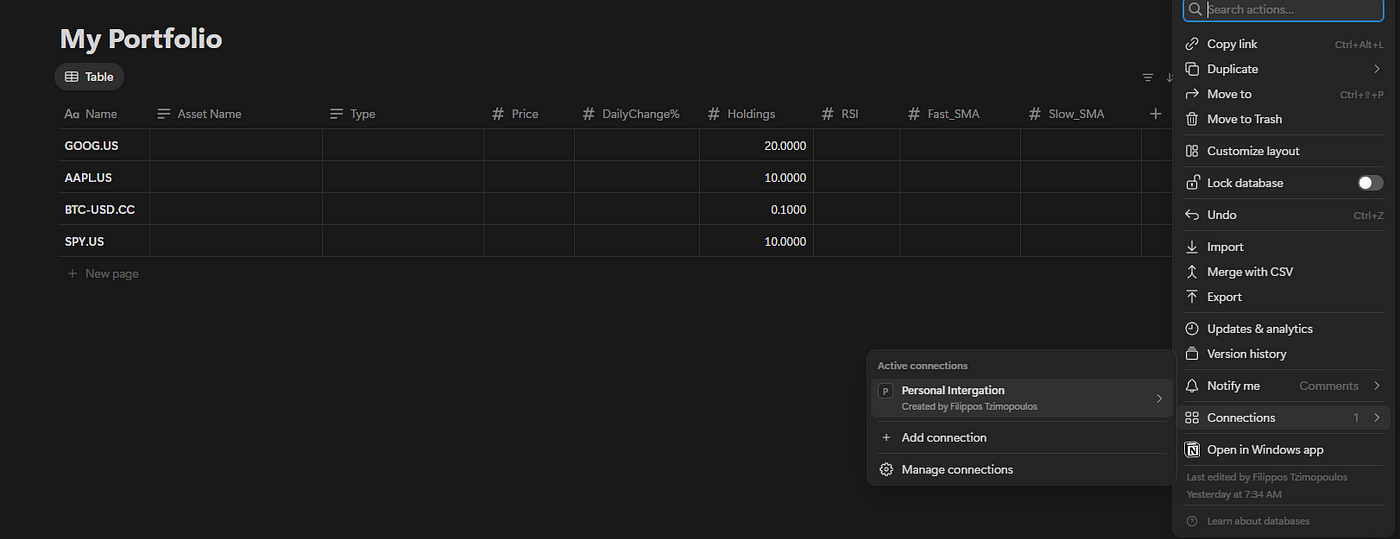
With some dummy data I've entered for our example, the database will look like this:

One final thing before we move on to the live update: the API integration we set up at the beginning won't work unless we give the database access to it. To do this, go to the three dots, select 'Connections', and then choose the integration you've created.
Let’s update with Python.
First, you need to find the database ID, which is at the URL as highlighted below, after "notion.so" and before the question mark.

Before we start coding, I'd like to point out that there are some Python libraries for communicating with Notion. They might do it in a more 'Pythonic' way, but in the end, you still need to dive deep into the JSON structure of each Notion object. So, I've decided to write a few lines of code to create functions that do exactly what I want. If I come across an issue, I can just fix it, rather than trying to figure out where the problem lies with the package or myself.
With that in mind, let's carry out the necessary imports and define the functions we'll need. Firstly, you'll need the Notion token you obtained from the integration above, the database ID, and your EODHD API token to perform the updates.
import requests
import pandas as pd
import os

NOTION_DB_ID = '<your database id>'
NOTION_TOKEN = os.environ.get('NOTION_TOKEN')
EODHD_API_TOKEN = os.environ.get('EODHD_API_TOKEN')
One of the key functions we'll develop is the one that takes a property and returns its value. We do this because Notion has a separate structure for each type of property, such as text, rich text, numeric, formula, and so on.
def extract_property_value(prop_data):

    prop_type = prop_data.get('type')

    # Handle title properties
    if prop_type == 'title':
        title_array = prop_data.get('title', [])
        if title_array and len(title_array) > 0 and 'plain_text' in title_array[0]:
            return title_array[0]['plain_text']
        return ""

    # Handle rich_text properties
    elif prop_type == 'rich_text':
        rich_text_array = prop_data.get('rich_text', [])
        if rich_text_array and len(rich_text_array) > 0 and 'plain_text' in rich_text_array[0]:
            return rich_text_array[0]['plain_text']
        return ""

    # Handle number properties
    elif prop_type == 'number':
        return prop_data.get('number')

    # Handle select properties
    elif prop_type == 'select':
        select_data = prop_data.get('select')
        if select_data and 'name' in select_data:
            return select_data['name']
        return None

    # Handle formula properties
    elif prop_type == 'formula':
        formula_data = prop_data.get('formula', {})
        formula_type = formula_data.get('type')
        if formula_type:
            return formula_data.get(formula_type)
        return None

    # Handle date properties
    elif prop_type == 'date':
        date_data = prop_data.get('date')
        if date_data and 'start' in date_data:
            return date_data['start']
        return None

    # Handle rollup properties
    elif prop_type == 'rollup':
        rollup_data = prop_data.get('rollup', {})
        rollup_type = rollup_data.get('type')

        # Handle array type rollups (most common)
        if rollup_type == 'array':
            array_data = rollup_data.get('array', [])
            if not array_data:
                return None

            # Get the first item in the array
            first_item = array_data[0]
            first_item_type = first_item.get('type')

            # Handle different types within the rollup array
            if first_item_type == 'select':
                select_data = first_item.get('select')
                if select_data and 'name' in select_data:
                    return select_data['name']
            elif first_item_type == 'rich_text':
                rich_text_array = first_item.get('rich_text', [])
                if rich_text_array and len(rich_text_array) > 0 and 'plain_text' in rich_text_array[0]:
                    return rich_text_array[0]['plain_text']
            elif first_item_type == 'number':
                return first_item.get('number')
            elif first_item_type == 'date':
                date_data = first_item.get('date')
                if date_data and 'start' in date_data:
                    return date_data['start']

        # Handle other rollup types (number, date, etc.)
        elif rollup_type:
            return rollup_data.get(rollup_type)

        return None

    # Handle relation properties
    elif prop_type == 'relation':
        relation_array = prop_data.get('relation', [])
        if relation_array:
            # Return the list of relation IDs
            return [item.get('id') for item in relation_array if 'id' in item]
        return None

    # Handle other property types
    else:
        print(f"Unsupported property type: {prop_type}")
        return None
With the above function at our fingertips, we'll create a new function that reads the database and returns the contents as a Python dataframe.
def get_notion_database(NOTION_DB_ID):
    url = f'https://api.notion.com/v1/databases/{NOTION_DB_ID}/query'
    headers = {
        'Authorization': f'Bearer {NOTION_TOKEN}',
        'Notion-Version': '2021-08-16',
        'Content-Type': 'application/json'
    }

    response = requests.post(url, headers=headers)
    data = response.json()

    # Extract data from the "results" list
    results = data["results"]

    # Create a list to store the extracted data
    notion_db_data = []

    # Extract all properties for each item
    for item in results:
        # Always include the item ID
        stock = {'item_id': item['id']}

        # Dynamically extract all properties
        for prop_name, prop_data in item['properties'].items():
            value = extract_property_value(prop_data)
            # Use the property name as the column name
            stock[prop_name] = value

        notion_db_data.append(stock)

    # Create DataFrame from the extracted data
    df = pd.DataFrame(notion_db_data)
    return df
Lastly, we'll set up a function that updates a specific field for a particular item in your database.
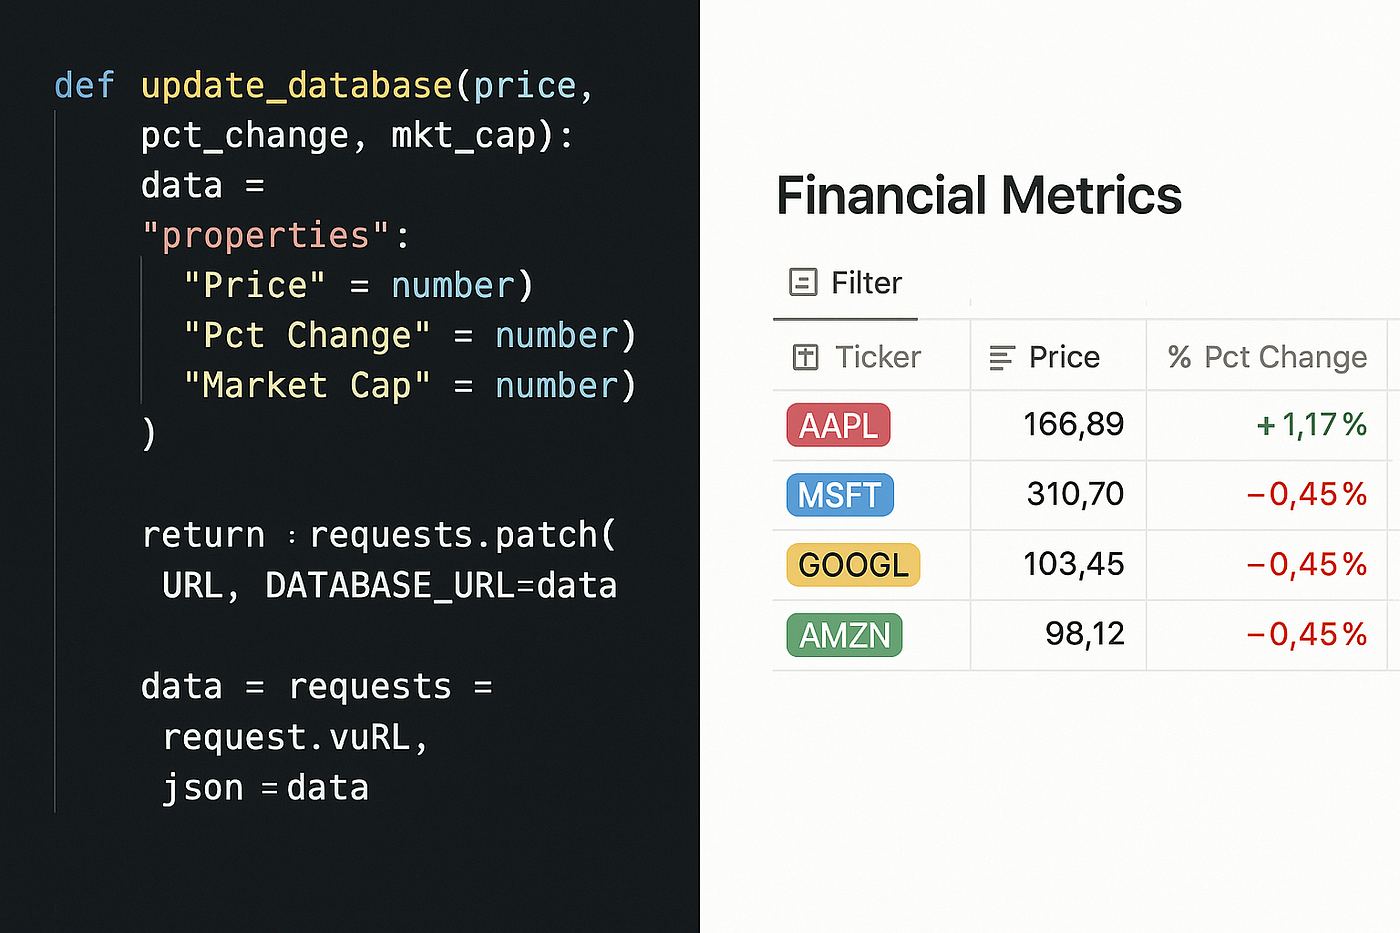
def update_notion_field(item_id, field_name, field_type, field_value):
    url = f'https://api.notion.com/v1/pages/{item_id}'
    headers = {
        'Authorization': f'Bearer {NOTION_TOKEN}',
        'Notion-Version': '2021-08-16',
        'Content-Type': 'application/json'
    }

    # Create the appropriate property structure based on field type
    if field_type == 'number':
        property_value = {"number": field_value}

    elif field_type == 'title':
        property_value = {
            "title": [
                {
                    "type": "text",
                    "text": {"content": field_value}
                }
            ]
        }

    elif field_type == 'rich_text':
        property_value = {
            "rich_text": [
                {
                    "type": "text",
                    "text": {"content": field_value}
                }
            ]
        }

    elif field_type == 'select':
        property_value = {
            "select": {"name": field_value}
        }

    elif field_type == 'date':
        property_value = {
            "date": {"start": field_value}
        }

    else:
        raise ValueError(f"Unsupported field type: {field_type}")

    # Construct the payload
    payload = {
        "properties": {
            field_name: property_value
        }
    }

    # Send the update request
    response = requests.patch(url, headers=headers, json=payload)
    print(f"Field '{field_name}' updated successfully for item {item_id}.")
    return response.json()
Now the fun begins! Let’s go ahead and retrieve the database.
df = get_notion_database(NOTION_DB_ID)
df
As you'll see, the columns match the ones you created earlier. Each row also has its own unique item ID.
Firstly, using the EODHD API, we'll loop through the dataframe to update the price and daily change in the database.
# Loop through each stock in the dataframe
for index, row in df.iterrows():
# Get the ticker symbol from the dataframe
ticker = row.get('Name')
# Construct the EODHD API URL
url = f'https://eodhd.com/api/eod/{ticker}'
query = {'api_token': EODHD_API_TOKEN, 'fmt': 'json', 'order': 'd'} # Descending order to get latest first
# Make the API request
response = requests.get(url, params=query)
# Parse the response
data = response.json()
# Get the latest price (first entry in descending order)
latest_data = data[0]
current_price = latest_data['close']
# Get the previous day's price (second entry)
previous_price = data[1]['close'] if len(data) > 1 else None
daily_change = (current_price - previous_price) / previous_price
# Update the price and daily change in Notion
item_id = row['item_id']
update_notion_field(item_id, 'Price', 'number', current_price)
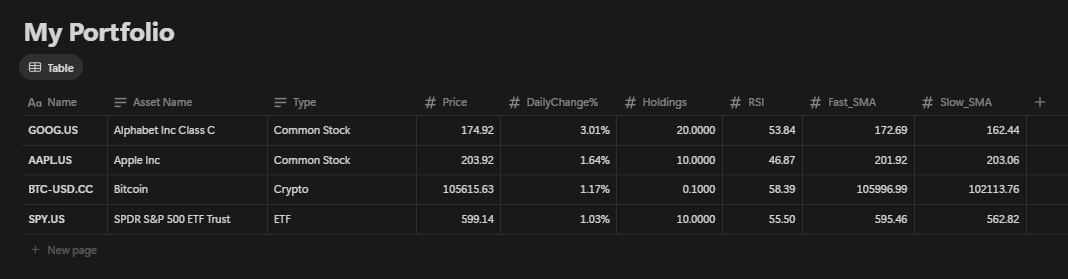
update_notion_field(item_id, 'DailyChange%', 'number', daily_change)If you have the Notion database open in your browser, you should have seen the prices being updated one by one, and once finished, you will have the database shown below.
Let’s see the code now to update the name and the type of the asset
for index, row in df.iterrows():

    ticker = row.get('Name')
    item_id = row['item_id']

    url = f'https://eodhd.com/api/fundamentals/{ticker}'
    query = {'api_token': EODHD_API_TOKEN, 'fmt': 'json'}

    response = requests.get(url, params=query)
    data = response.json()

    # Get the company name from fundamentals data
    if 'General' in data and 'Name' in data['General']:
        company_name = data['General']['Name']
        update_notion_field(item_id, 'Asset Name', 'rich_text', company_name)

        # Get the company name from fundamentals data
    if 'General' in data and 'Type' in data['General']:
        company_name = data['General']['Type']
        update_notion_field(item_id, 'Type', 'rich_text', company_name)
Finally, the EODHD API for the technicals will be very useful for updating both the RSI and MAs.
for index, row in df.iterrows():

    ticker = row.get('Name')
    item_id = row['item_id']

    # Get RSI
    url = f'https://eodhd.com/api/technical/{ticker}'
    query = {'api_token': EODHD_API_TOKEN, 'fmt': 'json', 'function': 'rsi', 'order': 'd'}  # Descending order to get latest first

    response = requests.get(url, params=query)

    if response.status_code == 200:
        data = response.json()
        if data and len(data) > 0:
            # Get the latest RSI value (first entry)
            latest_rsi = data[0]['rsi']
            update_notion_field(item_id, 'RSI', 'number', latest_rsi)
            print(f"Updated RSI for {ticker}: {latest_rsi}")

    # Get SMA with period 9
    query = {'api_token': EODHD_API_TOKEN, 'fmt': 'json', 'function': 'sma', 'period': 9, 'order': 'd'}  # Descending order to get latest first

    response = requests.get(url, params=query)

    if response.status_code == 200:
        data = response.json()
        if data and len(data) > 0:
            # Get the latest SMA9 value (first entry)
            latest_sma9 = data[0]['sma']
            update_notion_field(item_id, 'Fast_SMA', 'number', latest_sma9)
            print(f"Updated SMA9 for {ticker}: {latest_sma9}")

    # Get SMA with period 51
    query = {'api_token': EODHD_API_TOKEN, 'fmt': 'json', 'function': 'sma', 'period': 51, 'order': 'd'}  # Descending order to get latest first

    response = requests.get(url, params=query)

    if response.status_code == 200:
        data = response.json()
        if data and len(data) > 0:
            # Get the latest SMA51 value (first entry)
            latest_sma51 = data[0]['sma']
            update_notion_field(item_id, 'Slow_SMA', 'number', latest_sma51)
            print(f"Updated SMA51 for {ticker}: {latest_sma51}")
At the end, our notion database will be as follows:
Calculated fields
So far, it's interesting, but it's not immediately clear what's going on. Let's create some auto-calculated fields to help.
The first point will be the obvious one: what is the total value of each asset? We will add a property of type “formula”. This formula will be the result of the holdings multiplied by the price.

For the RSI, we'll use a formula similar to an Excel formula. If the value is over 70, it will display as 'Overbought', and if it's below 30, it will show as 'Oversold'. Anything in between will be labelled 'Neutral'.

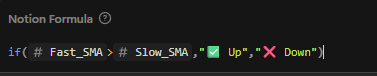
and one more field where we'll be calculating the trend by comparing the fast with the slow-moving average.
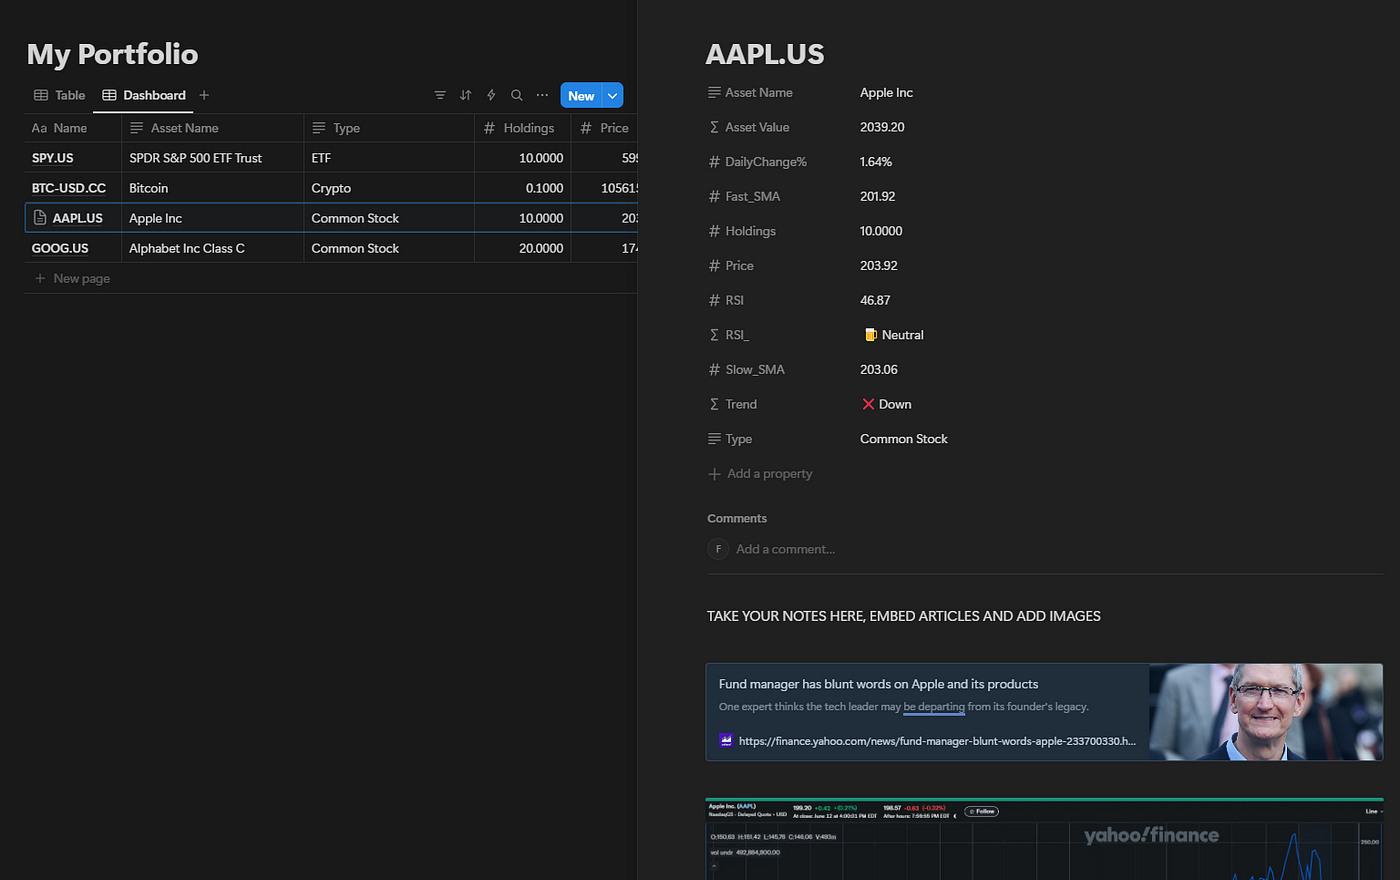
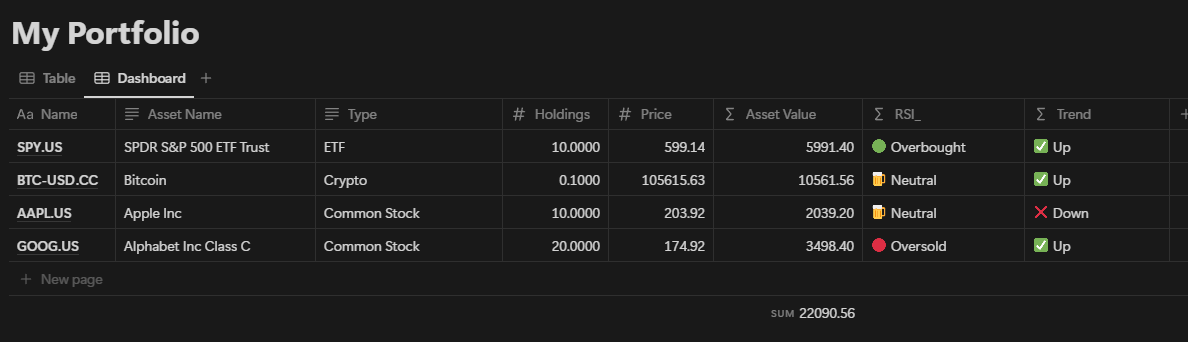
Now you should have everything ready as outlined below, but it may still be overwelming due to the amount of information.

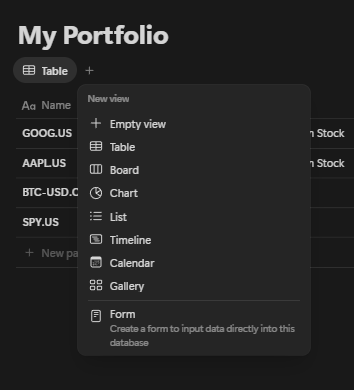
So, let's create a more compact view. By selecting the plus sign next to the table, we'll choose to add an empty view.
That will direct us to the View Settings, where we can add a name (e.g. Dashboard) and then select the Property visibility. This is where we can choose which rows to display and the order in which they'll appear by dragging and dropping on the list.
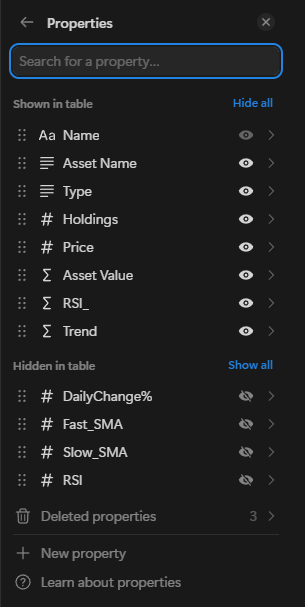
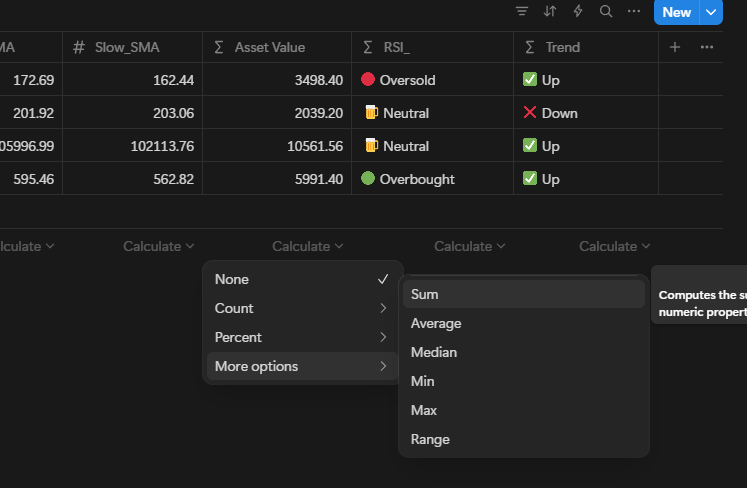
One final task is to include a display of our portfolio's total amount. This can be accomplished by hovering your mouse over the Asset Value column and adding the sum as a calculated field.
At last, we have arrived. We possess a custom-made compacted view containing all the information we require!
Easter Egg!
One more thing you can do with Notion that is extremely handy is that you can take notes for each asset in the usual user-friendly way of Notion. This is because each row of the database essentially functions as a page. When you hover over the name column, you will see an “OPEN” sign. If you select it, it will reveal the page. At the bottom, you can take notes, add links to webpages, or include images as shown below!